The solution to Crossword Puzzle One will be posted next month with Crossword Puzzle Two.
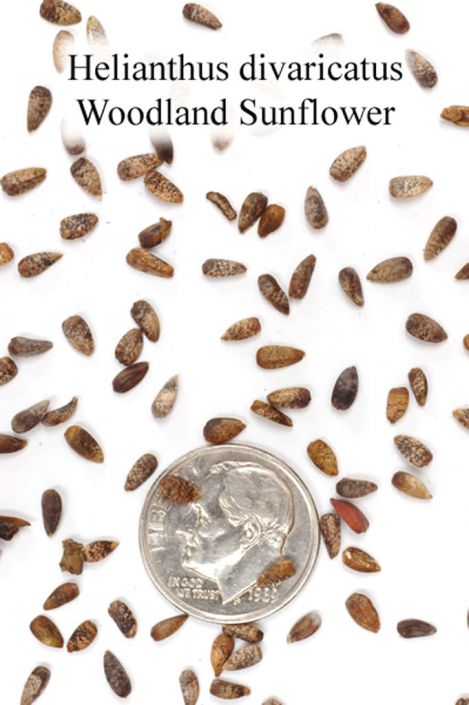
Helianthus Divaricatus
As I write this, winter storms are threatening parts of the Great Lakes region, with snow and freezing rain forecast. So to help us escape for a moment from the impending winter, I thought this month’s native plant of the month should be the quintessential summer blossom. And what could be more summery than a Sunflower? Woodland Sunflowers will thrive in full sun to part shade and promise to brighten your garden for much of the summer and into the fall.

Common Name: Woodland Sunflower
Scientific Name: Helianthus divaricatus
Family: Asteraceae (Aster Family)
Alternate Common Names: Rough Sunflower, Rough Woodland Sunflower
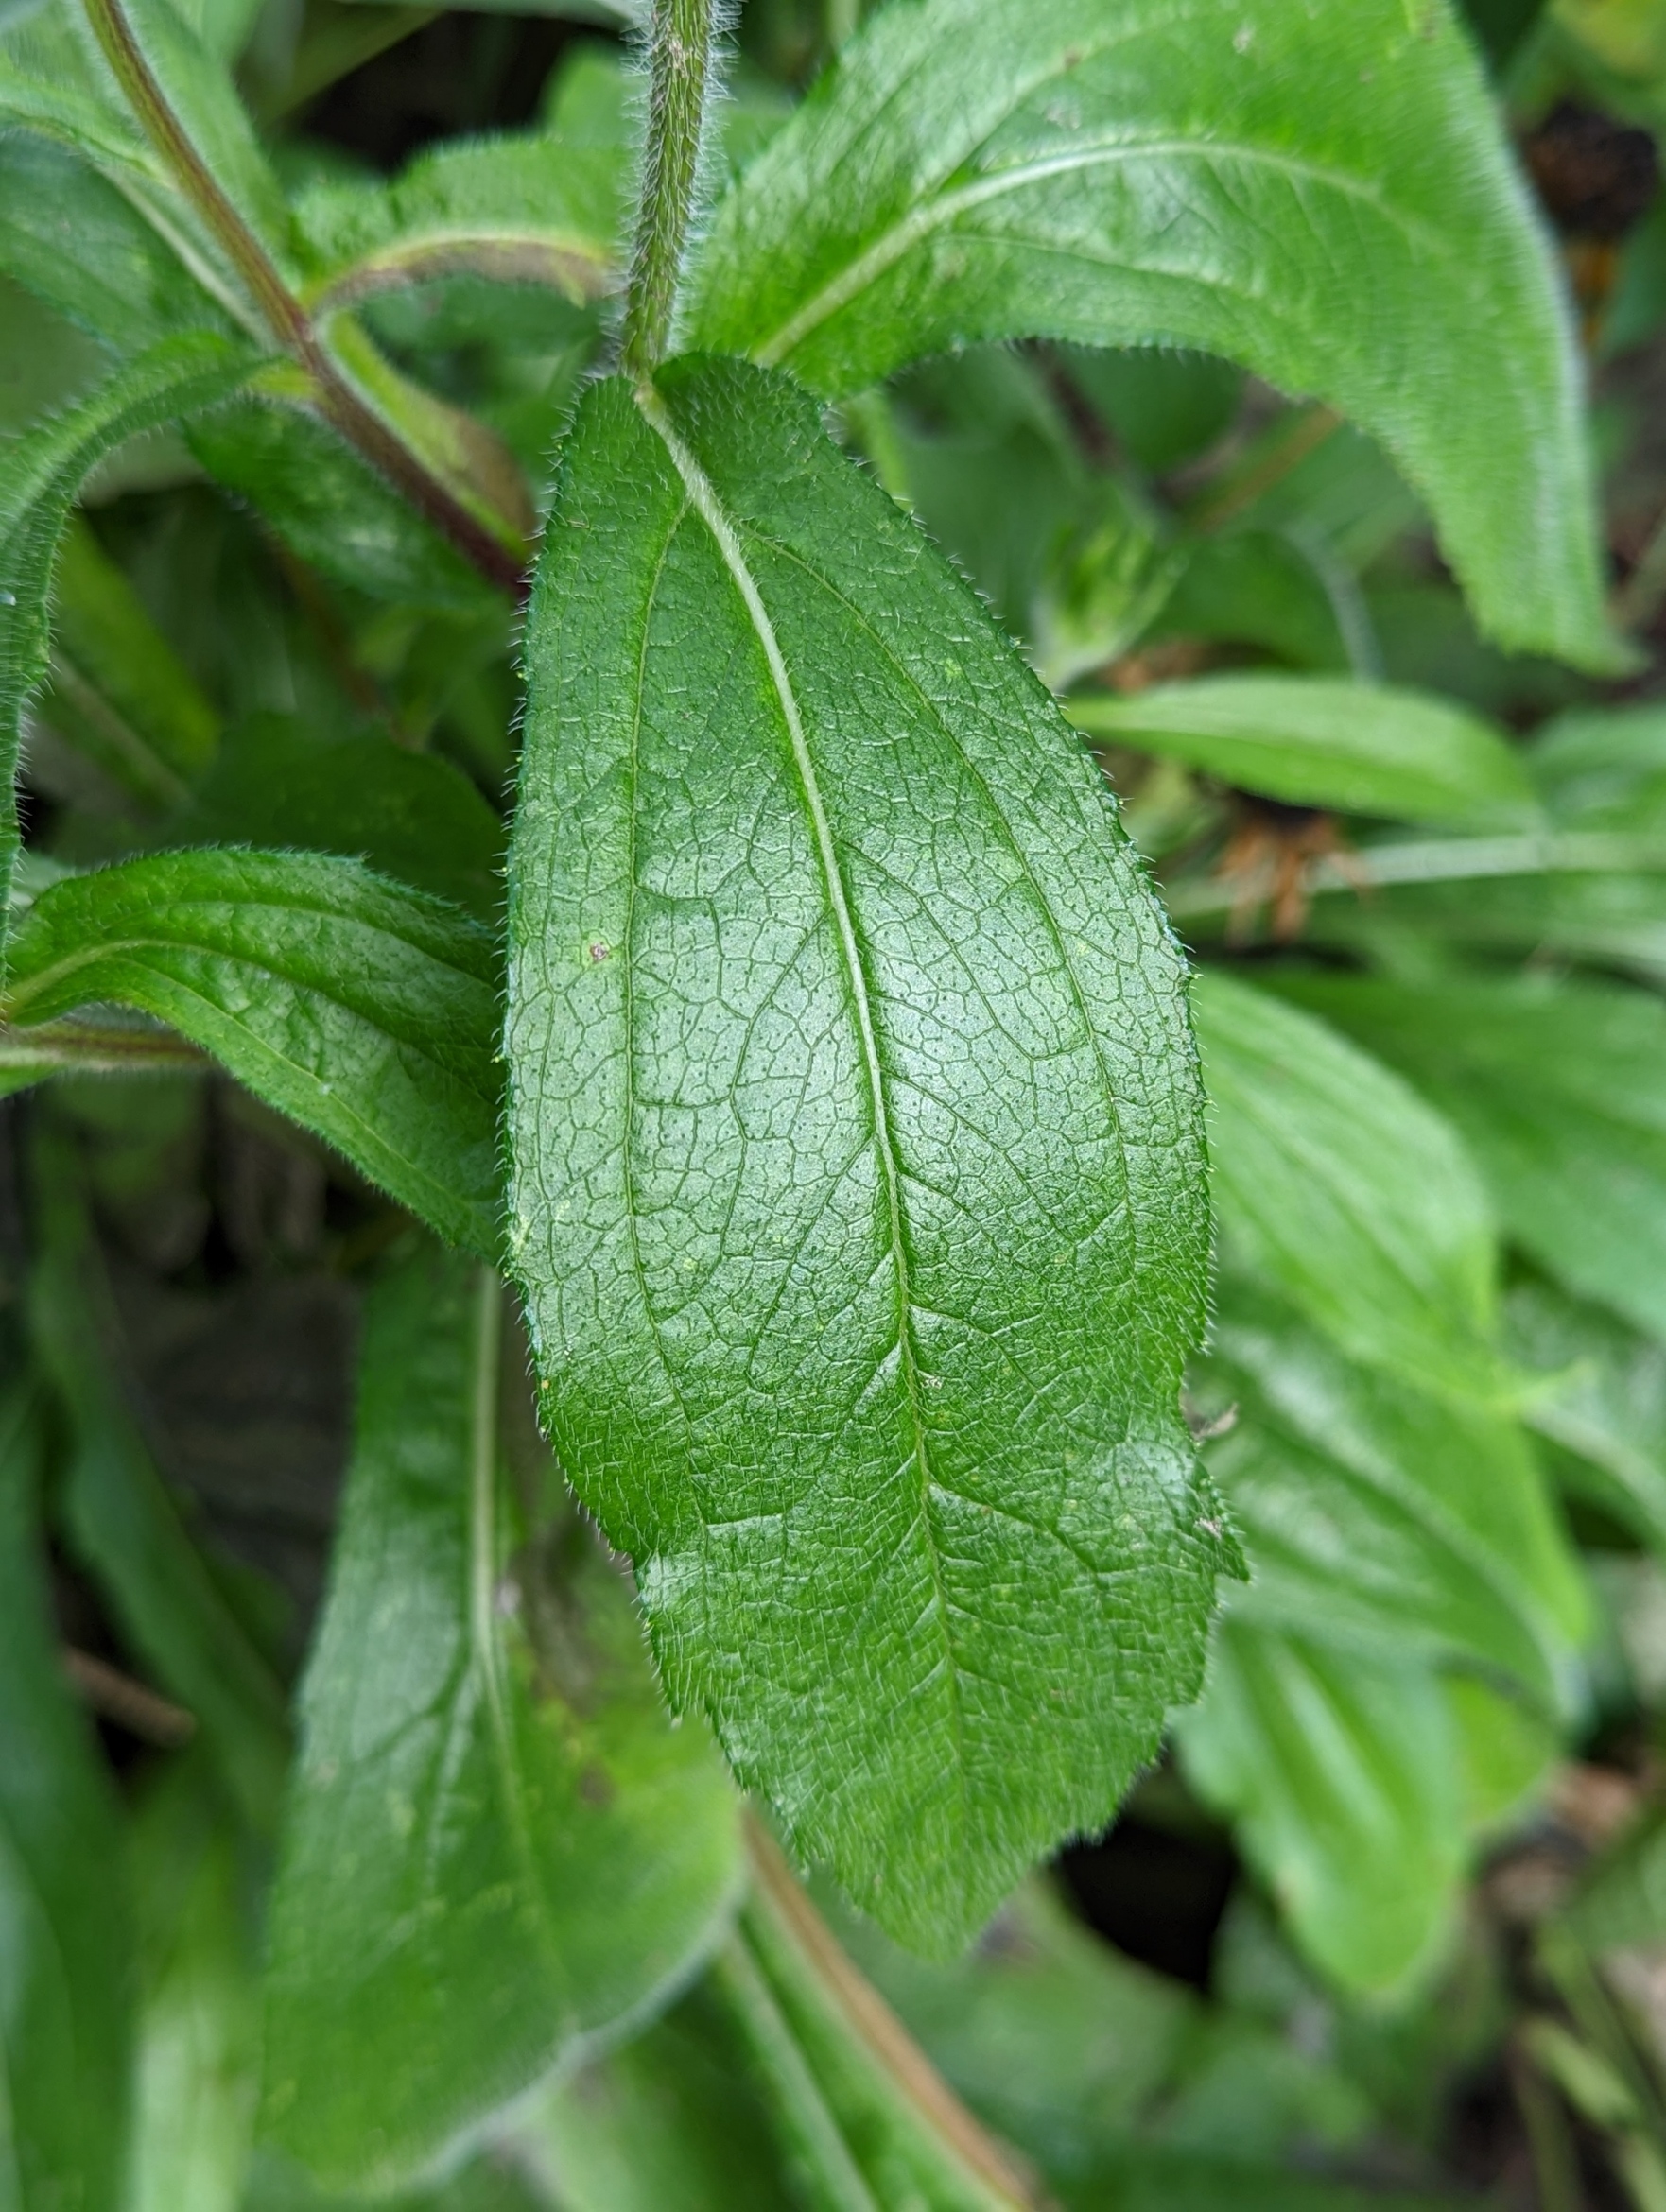
Plant description: Woodland Sunflower has rigid, upright stems that are unbranched except for where flowers occur. These stems are light green to dark purple and smooth or sparsely covered in short, stiff hairs. Alternate leaves are attached directly to the stem in an opposite pattern and are rotated 90 degrees horizontally from the leaves below them. Leaves are lance-shaped to ovate with a rounded base, pointed tip and measure up to 15cm long and 5cm across. Leaf margins may be toothless or have widely spaced teeth. Stems terminate with 2.5-7.5cm wide flowers borne on slender stalks. Each flower is characterized by 8-15 bright yellow, widely spreading ray florets (petals) surrounding a slightly darker center disk. Flowers are replaced by globular seed heads containing numerous black seeds.


In the Garden: The radiant yellow flowers of Woodland Sunflower bloom in profusion and lighten up partly shaded areas of the garden. Its adaptability and long bloom time mean it will quickly become a favourite in your garden. The flowers fade to globular seed heads that persist well into the winter months to extend seasonal interest and wildlife value.
Lifespan: perennial
Exposure: sun, part shade
Soil Type: sandy, loamy or rocky
Moisture: moist to dry
Height: 30-180 cm
Spread: 30-90 cm
Bloom Period: Jun, Jul, Aug, Sep
Colour: yellow
Fragrant (Y/N): N
Showy Fruit (Y/N): N
Cut Flower (Y/N): Y
Pests: no serious insect or disease problems
Natural Habitat: dry, open woodland or savanna
Wildlife value: the nectar and pollen of the flowers attract a wide variety of insects and native bees, and the seeds are eaten by many small birds, squirrels and mice
Butterfly Larva Host Plant For: Silvery Checkerspot (Chlosyne nycteis) and Gorgone Checkerspot (C. gorgone), and Painted Lady (Vanessa cardui)
USDA Hardiness Zone: 3-8
Propagation: Seeds direct sown in the fall will germinate in the spring. If starting the seeds in doors, requires 30 days cold moist stratification. Divide every 3-4 years to control spread and maintain vigor.
Additional Info: Spreads over time by creeping rhizomes to form colonies. Woodland Sunflower is a vigorous spreader and therefore may not be suitable for small planting areas.
Native Range:

The Boggy, Boggy Dew
Creating a Bog Garden
I am fortunate, as a native plant gardener, to have a ½ acre property with dry shade, dry sun, moist shade, moist sun, and everything in between. Combine this with rich, sandy-loam soil and, for the most part, if I accidentally drop a plant on the ground, it will take root and grow (at least that’s what my friends claim). This has allowed me to create gardens of deep-shade forest perennials and tall grass prairie, of moisture loving ferns and drought tolerant grasses.
Escarpment and Waterfall
In 2012, I decided to take advantage of a slope in my yard to build my “escarpment”, complete with a small pond and a disappearing waterfall. This has provided even more habitat choices where I can now grow things like smooth cliffbrake (Pellaea glabella) – a fern that lives on limestone cliff faces. The pond and waterfalls provide the moisture needed for things like the semiaquatic blue flag iris (Iris versicolor), bog bean (Menyanthes trifoliata) and large leaved arrowhead (Sagittaria latifolia). I even planted some Green Dragon (Arisaema dracontium) this past spring in a pocket of moist soil at the edge of the falls.


Despite all this variety, I still felt there was something missing so in October of 2019 I decided to build a bog garden where I could grow things like orchids, pitcher plants, sundews and other acidic-moisture loving species that grow in the bogs and wet areas of Ontario. Today’s article is about how I built it and some of the lessons I learned along the way.
What is a Bog?
But first, what is a bog (and thus a bog garden). A bog is one of four main types of wetland – bog, fen, marsh, and swamp. Of these, bogs and fens consist of saturated nutrient-poor acidic bodies primarily made up of sphagnum (peat) mosses and peaty soils and very little flow of water. Marshes and swamps, on the other hand, tend to be alkaline with a constant change of water through the system. The main difference between a bog and a fen is that bogs are fed solely by rainfall, whereas a fen receives water through groundwater and surface water, resulting in a slightly less acidic environment (by this definition, my “bog” garden is actually more akin to a fen as there is a constant exchange of “groundwater” because of the way it is built.) As a consequence, fens typically have a greater diversity of vegetation, which may include more in the way of shrubs and trees.
In addition to sphagnum moss, the vegetation in a bog consists of heaths (Erica spp.), sedges (Carex spp.) and grasses such as cotton grass (Eriphorum spp.). Bogs also are the home of carnivorous plants such as pitcher plant (Sarracenia purpurea in our region) and sundews (Drosera spp.). These plants have resorted to capturing and dissolving insects for the nitrogen and other nutrients the acidic soils lack. Bogs are also a place where you can find a variety of orchids (Platanthera spp., Spiranthes spp., Cypripedium spp. and several others). Most of these plants are low growing, exotic looking, and can add a beautiful splash of colour to your yard.


Locating the Bog
The first steps to building my bog garden, as with all my projects, was to find the most suitable location. I needed an area that I could keep constantly wet. At first I thought I might be able to build it at the outflow from the downspout of my house, similar to a rain garden. But a rain garden is usually designed with plants that can tolerate drying out between rainfall events but won’t easily drown if submerged for short periods. Ideally, a bog garden will stay continuously wet – in fact some bog plants will quickly die if they dry out. I then wondered whether I could use my existing water feature by building a bog at the base of the waterfalls.
Waterfall Reservoir
At the base of the falls is a pit approximately 3’ deep and 10’ across, lined with a rubber pond liner and filled with rocks (large ones at the bottom, smaller near the top). A large diameter pipe holds the circulating pump that takes the water up to a small pond at the top where it tumbles back down to the pit. Originally, I had to top up the reservoir at least once a month in the summer because of splash and evaporation, but I have since tied in the downspouts from the house and I now only top it up in prolonged periods of drought. Since this reservoir is almost always full of water, it seemed the perfect spot to put my bog.


Building the Bog – STAGE 1
The first thing I needed to do was excavate a hole. Given the substrate consisted of pure river rock, this was not as easy digging as it would have been in soil. But I soon discovered (after a heavy rain brought the water level in the reservoir up to the top) that digging rocks in a flooded area was actually easier than digging them when it was dry. It was just harder to tell how far down I was going. I just kept digging till the water in the hole seemed to be at least 18” deep throughout. Once I had the hole deep enough, I then placed a rubber pond liner into the new pit and proceeded to poke a number of holes in it with a garden fork. The idea was to allow some exchange of water through the liner rather than rely entirely on rainfall and splash from the falls. (If I were to do it over, I would likely have eliminated the holes in the liner and had a truer “bog”, but I didn’t know if I could keep the soil moist enough with just splash from the waterfalls.)


Creating the Bog “Soil”
When you Google bog gardens, you’ll get a wide range of recipes for the soil – anywhere from 75% peat moss/25% sand to an equal mixture of peat moss, sand and local soil. The reason you don’t want a lot of the local soil is that bog plants don’t like a lot of nutrients. I decided on a mix of 50% peat moss (to keep it reasonably acidic), 25% sand and 25% soil (keep in mind that my soil is fairly sandy – if I had clay soils I might have gone with 2/3 peat moss and 1/3 sand – and I had lots of it available). I mixed all this in a wheelbarrow and filled the hole up. I then left it to settle over the winter, figuring I might have to top it up in the spring. In the spring I added another 2” or so of my peatmoss, sand and soil mixture.
Below are my video record of the construction of the bog garden, and what it looked like the first spring after it was built.
Then Came the Plants
Deciding which plants to plant was a lot easier than actually finding those plants. In addition to the Purple Pitcher Plant (Sarracenia purpurea) that a friend gave me, I also managed to locate some Showy Lady’s Slipper Orchids (Cypripedium reginae) from an orchid breeder near Toronto, and I purchased and sowed the fine, powder-like seeds of several other orchid species (unfortunately, none of these grew).

But since, like nature and a vacuum, gardeners abhor an empty garden space, I started adding some interesting non-bog plants that liked lots of moisture while I searched for the real things. These included Southern Blue Flag Iris (Iris virginica), Bog Goldenrod (Solidago uliginosa), Ohio Goldenrod (S. ohioensis), Blue Vervain (Verbina hastata), Monkey Flower (Mimulus ringens) and several others. Before I knew it, the bog garden was not only full, but full of large plants that overwhelmed the short bog plants that the garden was built for.


Next Steps
Now that the garden has been growing for 3 seasons and proven it works, I now have to do something about all the large plants that are taking over – including a number of volunteers that have seeded in from other gardens, including Joe Pye Weed (Eutrochium spp.), Boneset (Eupatorium perfoliatum), and a couple of asters. To that end, this fall I have started to prepare the ground for a 15’ X 15’ “wetland” that will have its own pond and be home to all these taller wetland species. Then I can get back to growing just my bog plants in the bog garden.
Conclusions
Building a bog garden is easy, providing you have a way to keep it moist all year long, and opens up the opportunity to grow some very interesting and unusual plants. Just don’t make my mistake of filling it up with non-bog plants – save those for a wetland or a rain garden.
From experience, I can tell you that trees and other plants readily seed into the constantly moist soil so you’ll want to make sure you remove them when they are little as they can very quickly develop expansive root systems, making them a challenge to dig out without disturbing the bog plants you want.
Below are a couple of videos I made in the first summer and in the following spring (if you’re interested in the progress). In the first video, the bog garden tours ends at about the 6 min 36 sec mark – the rest is about my pond and waterfall. The second video shows how things have very quickly started to fill in by the second year.
Plant of the Month: Pale Corydalis
November in southwestern Ontario means frosts, the first snowfall, and not much left flowering in the garden. In my garden there is one plant – Capnoides sempervirens – that looks wonderfully delicate, but those looks are deceiving. This tough little drought tolerant plant is one of the last to keep blooming – some years I have seen it flowering even after being buried by the first snowfall for several days.
This month’s Plant of the Month features Pale Corydalis (aka Rock Harlequin), a plant that Native Plant Gardening author Lorraine Johnson includes in her Dec 22, 2021 blog entitled “Ghost Plants”. These are plants that, in her words “are difficult to find at nurseries but that would be fabulous additions to gardens and, I’m sure, snapped up by gardeners if they were commercially available” (https://lorrainejohnson.ca/blog). I heartily agree – especially for this one.


Common Name: Pale Corydalis
Scientific Name: Capnoides sempervirens
Family: Fumariaceae (Fumitory Family)
Alternate Common Names: Colic Weed, Harlequin Corydalis, Harlequin Flower, Pale Fumewort, Pink Corydalis, Pink and Yellow Corydalis, Rock Harlequin, Tall Corydalis
Plant description: Pale corydalis is a biennial, producing a basal rosette of leaves during its first year of growth. These leaves are compound in groups of 3-5 with each individual leaflet being deeply cleft into 2-3 parts. These are further divided into 2-3 narrow, rounded segments. Leaves have a blue-green waxy appearance. During its second year of growth, it sends up many branching, erect, hairless, blue-green stems from its basal rosette. Lower leaves are stalked while upper leaves become increasingly stalkless as they ascend. Stems terminate with clusters of dangling, tubular flowers that each measure 1.5cm long. They are somewhat flattened with varying shades of pink tubes and yellow lips at the end of the tubes. Each flower has a pair of teardrop shaped sepals clasping it. Flowers give way to long, narrow seed pods that split open when ripe to reveal tiny black seeds.


In the Garden: Pale corydalis is a unique looking plant with lacy foliage and captivating pink and yellow flowers. It is valued by gardeners for its ease of growth in tough, dry, rocky sites and for its long bloom time. As a biennial, it will only live for two years so expect it to persist in your garden via self-seeding. It is an excellent addition to just about any garden, but is especially effective in the rock garden.
Lifespan: annual/biennial
Exposure: full sun to part shade
Soil Type: poor, dry, gravelly soil
Moisture: dry
Height: 80 cm
Spread: 10 cm
Bloom Period: May to freeze-up
Colour: pink and yellow
Fragrant (Y/N): N
Showy Fruit (Y/N): N
Cut Flower (Y/N): Y
Pests: may be affected by the Macrosiphum corydalis aphid, but other than that is virtually disease and pest free.
Natural Habitat: dry woods, rocky ledges and recent clearings, often growing in areas disturbed by fire
Wildlife value: Long tongued bees, particularly bumblebees, are pollinators and the seeds have an elaiosome (food package) which ants take back to their nest, and thus help to distribute. The nectar rich flowers are also often visited by Skipper butterflies.
Butterfly Larva Host Plant For: none
USDA Hardiness Zone: 2-10
Propagation: Easy to start from seed, no treatment is necessary if the seeds are collected and sown early in the summer. These will produce a rosette by fall and bloom the next year. Seeds collected in the fall, or kept over winter, should be cold-moist stratified for 30 days. These spring sown seeds will flower the following year.
Additional Info: Formerly known as Corydalis sempervirens, it was recently changed to Capnoides sempervirens, and is the only species in the genus Capnoides. This tough little flower will withstand harsh conditions, but does not fare well with a lot of competition. Because of its propensity to self seed, some people find it to be weedy but its delicate flowers and blue-green foliage are welcome anywhere they want to be in my gardens. This species is classified as Endangered in Indiana and Ohio.
Native Range:

A Marsh Marigold by Any Other Name
William Shakespeare, in his play Romeo and Juliet, wrote “A rose by any other name would smell as sweet”. So why does it matter what we call it, then? And why do people like me sometimes get so frustrated when folks use common names instead of the scientific names for plants? In today’s article, I want to explore the benefits, and in some cases the frustrations, of using scientific names for our native plants instead of (or, at least, in addition to) the common names.

“Latin is a dead language, so why do we use it for plants?” The simple answer – tradition. However, every plant has but one “scientific name”, or scientific binomial, that is unique to that plant, whereas it may have 2 or 3 (and, in some cases, dozens of) common names. What’s worse, the same common name is often used for many different plants.
For instance, as I pointed out in last month’s blog post, when I talk about Black-eyed Susans, I could be referring to Rudbeckia hirta (an annual/biennial) or Rudbeckia fulgida (a perennial, also known as Orange Coneflower) or even Rudbeckia triloba (a perennial also known as Brown eyed Susan) depending on what part of the country you are in.


Both Asclepias hirtella and A. viridiflora are called Green Milkweed, though in some locations A. hirtella is known as Tall Green Milkweed – which is what I call it to help me keep the two separate in my mind.


Is Wild Columbine the same plant as Eastern Red Columbine? Yes, it is. It is also known as Cluckies in some parts. In other areas they call it Jack-in-trousers. But it is also known as Rock Lily. All these common names, yet it has only one scientific name – Aquilegia canadensis.
Caltha palustris – commonly called Marsh Marigold – has at least 30 distinct common names that I have been able to find, and a whole lot more if you count names that are similar but just spelled differently. Some of these names are just plain weird, if you ask me. Here are just a few of them (in alphabetic order): Boots, Brave Bassinets, Bull Flower, Cow Lily, Cowslip, Crazy Beth, Crowfoot, Drunkards, Goldes, Gools, Horse Blob, King’s Cup, Mare Blob, Marybuds, May Blob, Meadow Buttercup, Meadow Cowslip, Meadow Gowan, Meadow-bright, Mireblob, Publican’s Cloak, Publicans-and-sinners, Soldier’s Buttons, Water Boots, Water Buttercup, Water Cowslip, Water Dragon, Water Goggles, Water Gowan, Yellow Gowan. And that’s just a partial list. Horse Blob??? Crazy Beth??? Where do they come up with these names?


And then there is Goat’s Rue – a name used for both the rare native Tephrosia virginiana which is considered critically imperilled in Ontario, and the non-native Galega officinalis, considered an invasive species in Pennsylvania. Knowing the scientific binomial can prevent a lot of confusion. It can also keep you from buying the wrong plant.


But why is it called a binomial? Because the name consists of 2 parts. The first part is the genus (plural genera) – which always starts with a capital letter. The families of plants (e.g. Asteraceae – Aster Family; Laminaceae – mint family; Liliaceae – lily family; Ranunculus – Buttercup family, etc.) are subdivided into genera – which are groupings of similar plants within that family.
The second part of the binomial is the species name or “specific epithet”, which always starts with a lower-case letter and represents closely related plants within a genus. Example: Asclepias tuberosa. Asclepias tells us this plant is in the genus that contains the milkweeds, and tuberosa tells us which species of milkweed plant it is – in this case Butterfly Milkweed. Note that, by tradition, foreign words (including Latin) are always written in italics.
A tip for trying to remember the Latin names (though even this is not consistent) is that you can often figure out how the species name ends (is it with an -a, a -um or something else?) by looking at the genus. Latin has feminine, masculine and neuter (neutral) words that may or may not have different endings. Names that end in “-us” are masculine. Words ending in “-a” are feminine, and those ending in “-um” are neutral. So the species name should match the gender of the genus.
For instance, Purple Coneflower is Echinacea purpurea (feminine) and Sweet Joe Pyeweed is Eutrochium purpureum (neutral) while the South American native Morning Glory was called Convolvulus purpureus (masculine) until they changed the Genus to the feminine Ipomoea and had to change the species to purpurea to match the gender.


But just to make sure you don’t find this straight forward and starting to make sense, a number of scientific names for plants are based on Greek and not Latin, which have different endings for masculine, feminine and neutral words. And these are less consistent than their Latin counterparts. For example, the feminine ending –a (Monarda) is the same as the Latin, but –ago (Solidago), –e (Anemone), and –is (Anaphalis) are also feminine endings in Greek. Hence you get Solidago juncea, Anemone virginiana, and Anaphalis margaritacaea.


And though most of the Latin and Greek names are derived from some characteristic of the plant, such as sempervirens – which means “evergreen”, or racemosa – which indicates the flowers are in racemes, many plants are named after prominent botanists, such as Gentiana andrewsii (bottle gentian – named for Henry C. Andrews, 1794-1830) or Geranium bicknellii (Bicknell’s geranium – named for Eugene P. Bicknell, 1859-1925). The –ii at the end indicates the plant is named after a male. Rosa banksiae, the Lady Banks’s rose, on the other hand, is named after Dorothea Lady Banks, the wife of Joseph Banks (1743-1820) who sailed with James Cook on the Endeavour. But is the feminine usage because the person it’s named after is female? Or is it simply to match the feminine Rosa of the genus? The –ae on the end of banksiae is the plural ending of the Latin –a, though why it is plural is beyond me.


Confused yet? As they say on those cheap TV commercials – but wait, there’s more!
“Sometimes I see more than just the two names, and sometimes there is ‘cv’, ‘var.’ or ‘subsp.’ inserted between the names. What does that mean?” The cv is short for cultivated variety, often shortened to cultivar, which is a plant that has been selected for certain characteristics, but normally doesn’t produce true-to-seed. The var. is the abbreviation for variety (varietas in Latin). Botanists will sometimes see that one species has enough genetic variation to separate the plants, but they agree the two plants are still the same species as they can still crossbreed and produce viable offspring – which is one of the defining characteristics of a species. Subsp. is the abbreviation for subspecies – a similar condition. Both are used, but var. is more common in plants, and subsp. is more common with animals. (I don’t make the rules, I just try to follow them as best I can.)
Are the scientific names carved in stone? I wish! As our science allows us to better understand the genetics of plants, we have been realizing that early botanists didn’t always get it right. Sometimes a plant looks very much like another, so much so that early botanists were convinced they were different species in the same genus. But genetic testing is showing this to not be the case for several species.
Sometimes they simply move the plant to another genus, as with barren strawberry – formerly Waldsteinia fragarioides, now Geum fragarioides. In some cases, even the species name gets changed, too, as with white snakeroot – formerly Eupatorium rugosum, now Ageratina altissima.
Sometimes they have to come up with a brand new genus, as they have done for the asters of North America. Aster is now reserved for “old world” asters, as opposed to North American asters. On top of that, we now divide the North American asters into 11 different genera.
Then there is the Upland White Aster, which for many years was known as Aster ptarmicoides – one look at it will tell you that it is obviously an aster. Then an observant botanist realized that it hybridized with a couple of species of goldenrod, but never with an aster, and they discovered that it was a well disguised goldenrod – so the name was changed to Solidago ptarmicoides or Upland White Goldenrod.


And just to make things a bit more challenging, unfortunately not all botanists agree on the name that should be applied to a particular plant, so when you look up a plant online, you may find that the Database of Vascular Plants of Canada, or VASCAN for short calls it one thing, while the Royal Botanic Gardens at Kew calls it something else in their Plants of the World Online. Likewise, iNaturalist claims to follow the Catalogue of Life, but I have found a number of exceptions there, too. Just so you know, as a Canadian I choose to follow the VASCAN nomenclature.
Pronunciation of all these names is another thing altogether. I found a fairly good online pronunciation resource at https://baygardens.tripod.com/botlatin.html, but here are a couple of great books on Latin for gardeners that I have on my bookshelf and refer to quite frequently.


Using the scientific name for plants can help because, even if we don’t agree WHICH scientific name is the right one, no two plants will have the same scientific name, whereas one common name can apply to multiple plants. And this can help you get the plant you THINK you’re buying.
Hopefully you found this little tutorial useful. Your feedback is always appreciated.
As always, happy native plant gardening.
New England Aster
Who doesn’t love the purples of New England aster in the fall? These tall, prolific splashes of colour line the roadside ditches throughout much of our area and look so awesome growing with the bright yellow goldenrods and black eyed Susans. Easy to grow, even in a pot, this is a must have plant for anyone growing natives.

Common Name: New England Aster
Scientific Name: Symphyotrichum novae-angliae
Family: Asteraceae (Aster Family)
Alternate Common Names: First Flower, Hardy Aster, Michaelmas Daisy, Starwort
Plant description: New England Aster features rigid central stems that are brownish-red, covered in short white hairs and typically branch out towards the top of the plant. Leaves are borne on the stems in an alternate pattern and are up to 10cm long and up to 2.5cm wide. They are lance-oblong, toothless and are covered in fine hairs. The leaves are stalkless with a pair of lobes at the base that extend back to clasp the stem – a key identifier. Branching clusters of stalked flowers are found at the top of the plant. Flower stalks also emerge from upper leaf axils (where the leaf meets the stem). Individual flowers are up to 4cm across and consist of 40 – 100 narrow ray flowers (petals) that surround a yellow center. The center turns reddish-yellow with age. Petals can vary in colour from lavender to dark purple to pink. Bracts surrounding the base of each flower are found in 3-5 layers, narrow, widely spreading and covered in fine hairs. They are green but may have a purple tinge. Flowers give way to dry, light brown seeds with tufts of white hairs that allow them to be carried off by the wind.


In the Garden: New England Aster is a classic wildflower that puts on a dramatic floral display in fall. You can bring this display, and the butterflies that come with it, into your garden too as New England Aster is a reliable performer. This aster is not an aggressive spreader but may self-seed into gaps. It responds well to the Chelsea chop – cutting it back to 1/3 – ½ its height in June – which allows it to produce many more blossoms and remain more compact.
Lifespan: perennial
Exposure: full sun to part shade
Soil Type: sandy-loam to clay
Moisture: moist to medium
Height: 30-120 cm (occasionally to 200 cm)
Spread: 60-90 cm
Bloom Period: Aug, Sep, Oct (until frost)
Colour: pink/purple/blue
Fragrant (Y/N): N
Showy Fruit (Y/N): N
Cut Flower (Y/N): Y
Pests: no serious insect or disease problems though there is some susceptibility to powdery mildew and Aster Wilt can also be an occasional problem, particularly if plants are grown in poorly-drained clay soils
Natural Habitat: moist, open, wooded areas, meadows, mesic prairies, disturbed sites and stream banks
Wildlife value: bees and butterflies frequent this wildflower and it is an important nectar source for Monarch butterflies


Butterfly Larva Host Plant For: Painted Lady (Vanessa cardui), Pearl Crescent (Phyciodes tharos), Northern Crescent (Phyciodes cocyta), Silvery Checkerspot (Chlosyne nycteis) and Tawny Crescent (Phyciodes batesii)
USDA Hardiness Zone: 3-8
Propagation: Seeds do not need any pretreatment but moist stratification can speed germination. Can be propagated by stem cuttings taken in late spring and inserted into moist sand or rockwool. Mature plants may also be divided in the spring by separating individual stems with their associated roots.


Additional Info: New England aster has a tendency to become “root bound” and will benefit from dividing the plant every 3-4 years. Pinching back the stems a few times before mid-July will help to make the plant more bushy and eliminate the need for staking. The lower leaves often die back by the time flowers emerge so consider planting it with a companion that can hide the scraggly base.
Native Range:

Time for a Black Eye
Which Black Eyed Susan is Which?

Do you want a black eye? Black eyed Susan, that is. Or is that a brown eyed Susan? The other day someone asked me how to differentiate this group of plants that, at first glance, look so much alike. Today, I will attempt to tackle that question here.
Those who know me know that I get really frustrated with common names for plants. Depending on where you live, the name black eyed Susan is used for a number of different yellow flowers with a dark center. The most common ones, at least here in southern Ontario, are Rudbeckia hirta (which I call black eyed Susan), Rudbeckia triloba (brown eyed Susan) and Rudbeckia fulgida (orange coneflower). However, these plants also come with a lot of other names that you might know them by, just to keep things confusing. For example:
Rudbeckia hirta (Black Eyed Susan) is also called Bristly Coneflower, Brown Betty, Brown-eyed Susan, Common Black-eyed Susan, English Bull’s Eye, Gloriosa Daisy, Golden Jerusalem, Poor-land Daisy, Yellow Daisy and Yellow Ox-eye Daisy.
Rudbeckia fulgida (Orange Coneflower) is also known as Black Eyed Susan, Brilliant Coneflower, Brown Eyed Susan, Orange Rudbeckia, Perennial Black-eyed Susan, Showy Black-eyed Susan and Showy Coneflower.
Rudbeckia triloba (Brown Eyed Susan) also goes by the names Thin-leaved Coneflower, Three-lobed Coneflower and Three-lobed Rudbeckia.
But it’s not just the names that can be confusing. To the uninitiated, these 3 flowers look very similar. And the descriptions you read about them don’t always help, simply because there can be so much variability within each species that, until you get to know the plants, the descriptions seem to overlap.
Rudbeckia hirta – Black Eyed Susan
Let’s start with Rudbeckia hirta, Black Eyed Susan. For me, the main differentiating characteristic is the fuzzy leaves and stems – fuzzy enough that the leaves actually appear to be a lighter colour than the other Rudbeckias. But fuzziness is a relative characteristic as all 3 have a certain amount of hairiness to the leaves and stems. Once you see the leaves side by side, however, you will easily tell them apart in the future (most of the time).
R. hirta leaves tend to be strap-like and, on average, tend to be longer and narrower than the other two. And they are ALMOST ALWAYS very hairy.


This plant is quite variable in its nature, though. It may be an annual, a biennial or even a short-lived perennial in some cases. And the genetic variability within the species can result in individuals with different petal shapes, different leaf shapes and sizes, and even a range of hairiness of the stem and leaves. But on average, the leaves and stems have a pale fuzzy appearance. If it’s late in the season, they also tend to die off in early fall (at least the annual and biennial ones do) whereas R. fulgida and R. triloba tend to stay green well into the late fall, even after the flowers have finished.


Rudbeckia hirta does well in full sun to part shade in just about any dry to moist, reasonably fertile, well-drained soil. This plant will grow to a little over 3’ tall and in the wild is found in fields, open woods and along roadsides.
R. hirta Native Range:

Rudbeckia fulgida – Orange Coneflower
This shorter statured plant is an extremely popular garden perennial, mainly because once it starts blooming it tends to put on a non-stop show for months. In most years in my southwestern Ontario garden, it starts to flower in late June or early July and keeps going till frost – sometimes as late as November, though after the drought we had here this year, they’ve pretty much finished blooming in mid-September.
A very common cultivar (or nativar, if you prefer) is Goldsturm. There are also even shorter cultivars, usually with the word “Little” somewhere in the name. The straight species typically grows 2-3’ tall, as does the Goldsturm variety. Most of the others are only 1-2’ tall. I have yet to find a definitive article on how Goldsturm is different from the true species. If you have the scoop on this, please let me know.
The leaves on R. fulgida tend to be much wider than on R. hirta and usually have fairly large serrations along the edges, especially on the lower leaves. As you can see in the photos, though, they may have no serrations at all. And though they may feel somewhat rough and hairy, they are not nearly as hairy (on average) as R. hirta.


One thing is for sure – R. fulgida produces a much denser mass of colour than R. hirta, and for a much longer period of time, though R. hirta always starts flowering a couple of weeks before this one does. It’s not that fussy about where it grows – it will do well in moist to dry, sandy to clay soils in full sun to part shade. I have a patch that is in full, light shade and it is doing just fine.

R. fulgida Native Range:

Rubeckia triloba – Brown Eyed Susan
Not native in Ontario, this nonetheless very popular short-lived (typically 2-3 years) perennial is the tallest of the 3 plants discussed here – in ideal conditions (full sun, moist loamy soil) it can get upwards of 5’ in height, though one writer indicated his plant hit 8’ tall!
The easiest way to differentiate R. triloba from the other two is to take a look at the leaves near the base of the plant. These are what give this plant its specific epithet (or species name) – triloba. The lower leaves have 3 (occasionally 2) lobes, as seen in the accompanying photo. The upper leaves look quite similar to R. fulgida, with the same variability in hairiness and serrations.


The other telltale difference is that R. triloba also tends to have a fairly reddish stem – sometimes it may be a deep solid burgundy colour, but on other plants it may be more of a striped stem. The stems are almost always fairly hairy.


Rudbeckia triloba is probably the fussiest of the 3 for growing conditions, but it is still quite versatile. It prefers moist to mesic loamy or sandy-loam soils, though some clay is tolerated. Like Rudbeckia fulgida, it blooms from July to first frost.
R. triloba Native Range:

If you have a native plant gardening related topic that you would like to know more about, let me know and I will add it to my growing list (pun intended). If it’s something I get multiple requests for, or is simply something that strikes my fancy, it will surely move up the priority list.
Happy Native Plant Gardening.
Helianthus tuberosus – Jerusalem Artichoke
Fall is a time of food harvesting, and a few of our native plants have provided tasty nutrition for humans for hundreds if not thousands of years. One such plant is a member of the sunflower family, noted not for its sunflower seeds (of which it rarely produces any) but for its delicious roots. That plant is Helianthus tuberosus – the Jerusalem Artichoke.
Common Name: Jerusalem Artichoke
Scientific Name: Helianthus tuberosus
Family: Asteraceae (Aster Family)
Alternate Common Names: Canada Potato, Earth-apple, Girasole, Sunchoke, Sunflower Artichoke, Sunroot, Tuberous Sunflower
Plant description: Jerusalem Artichoke has upright, rigid stems that are light green to reddish brown in colour and are covered in stiff hairs. The stems are unbranched except for towards the top where the flowers are found. Shallowly toothed leaves occur in an opposite arrangement on the lower part of the plant and become alternate as they ascend the stem. They are up to 25cm long and 12cm wide, lance-shaped to ovate with a pointed tip, rounded base and rough texture on top. Leaves are borne on winged leaf stalks ranging from 2cm to 7.5cm long, becoming shorter as they ascend the stem. Stems terminate with flowers that measure up to 9cm wide and are characterized by 10-20 yellow ray florets (petals) surrounding a slightly darker center disk. At the base of each flower are 2-3 sets of overlapping bracts, each being 1.2cm long, hairy and pointed. Flowers become dry seed heads each containing flattened and slightly downy seeds.


In the Garden: Jerusalem Artichoke is a very robust sunflower, putting on a dramatic display of yellow blooms in early fall. The tall, rigid stems persist throughout the winter months to extend wildlife value and garden interest. Best suited to large gardens or naturalized areas where it can be allowed to spread.

Lifespan: perennial
Exposure: full sun to part shade
Soil Type: prefer loose, well-drained soil, but will tolerate poor soils.
Moisture: moist to dry, but do not plant in areas that are consistently wet, as wet soil will rot the tubers
Height: 300 cm
Spread: 100 cm
Bloom Period: Aug, Sep, Oct
Colour: yellow
Fragrant (Y/N): Y
Showy Fruit (Y/N): N
Cut Flower (Y/N): Y
Pests: powdery mildew
Natural Habitat: open areas and moist thickets, prairie remnants along railroads, moist meadows along rivers, woodland borders, and is mostly found in disturbed areas
Wildlife value: several native bees are attracted to the flowers and the seeds are an important source of food for many birds and small mammals; when growing near streams or ponds, H. tuberosa stems and leaves are used by beavers and muskrats for dam and den building
Butterfly Larva Host Plant For: Gorgone Checkerspot (Chlosyne gorgone), Silvery Checkerspot (Chlosyne nycteis), and Painted Lady (Vanessa cardui)


USDA Hardiness Zone: 3-9
Propagation: Although possible to grow from seed, it is rarely done because this plant is so easy to grow from tubers or pieces of tubers (also, seeds tend to have low viability). Place your tubers in the ground, root-down and stalk-up, around 12.5 cm deep, and cover with soil. The best time to plant is in the spring after the danger of deep freezing has passed, but these hardy plants can be planted just about any time the ground isn’t frozen.
Additional Info: Jerusalem artichoke has been grown commercially for use as a human food source, for livestock feed and for ethanol production. Cultivated varieties yield white tubers that are clustered near the main stem as opposed to wild types which produce reddish elongated tubers at the end of long rhizomes.
Jerusalem artichoke is a very aggressive spreader in the garden. In my own garden, I planted them in half of a plastic 45 gallon drum, buried in the ground, to prevent spreading into my lawn. Each fall I harvest all the pieces of root I can find, and the little pieces I miss are enough to provide a full crop the next year.

Native Range:

Jerusalem Artichoke on the menu: I normally don’t offer commentary on the edibility of native plants in the garden, nor instruction on preparing them as food. This is because I grow native plants for wildlife, not for my own consumption. Jerusalem artichoke is one of the exceptions.
The tubers of Jerusalem Artichoke are said to have a nutty flavour, somewhere between a potato and artichoke hearts (having never had artichoke hearts, I can’t verify this – but they do not taste anything like potatoes, in my mind). Depending on the variety and the growing conditions, the tubers may be small, thumb-sized or less, right up to the size of your fist.


Wash the tubers well, then pretty much anything you can do with potatoes you can do with these tubers: sliced and pan fried, steamed, boiled, microwaved, added to soups, roasted or even eaten raw to add a bit of crunch in salads. Google “Jerusalem artichoke recipes” and you’ll find lots. My personal preference is roasted in the oven or wrapped in tinfoil on the BBQ – this seems to concentrate the sugars and flavour.


According to the Food Revolution Network (https://foodrevolution.org/blog/jerusalem-artichokes/), “Jerusalem artichokes are also a good source of inulin and oligofructose, which are types of fiber that act as potent prebiotics, or food for probiotics, which are the good bacteria in your gut. Inulin is a soluble fiber that also works to balance your blood sugar.”
However, there is a downside for those with sensitive stomachs. The inulin and oligofructose can cause gas, bloating, and even abdominal pain and diarrhea in certain people. For this reason they are also known as “fartichokes”. Cooking them well can help reduce this effect, and some say that harvesting after a good frost also helps. As with consuming any wild plants, though, if you are at all concerned be sure to do some research first and approach with caution.
Most sources I’ve read indicate you can loosely wrap the tubers in a paper towel and store in the crisper drawer for up to two weeks. I either have an excellent crisper, or exceptional tubers: mine stayed crisp and delicious for more than 6 months left loosely bagged in an unsealed large freezer bag in the drawer.
Happy Native Plant Gardening.
How Does Your Garden Grow?

Many of is remember the old nursery rhyme Mary, Mary, quite contrary, How does your garden grow?
Although historians disagree on the possible political meanings behind this 18th century English nursery rhyme, I wish to use this question “How does your garden grow” to explore the various approaches to gardening with native plants.
Naturalized Gardens
We all garden with native plants for different reasons. Some gardeners attempt to create a more ‘natural’ habitat for insects, birds and other wildlife on their property and design their gardens around ecological principles. These gardens may often appear messy to the uninitiated, and are often more suited to larger properties and/or rural properties. Otherwise, they may fall afoul of local city ordinances that were often developed in the 60s and 70s when uniform, mowed grass was seen as desirable and when bylaws were enacted to prevent homeowners from simply neglecting their yards.


Formal Gardens
At the other end of the spectrum are those who have taken the formal flower beds of European ancestry and simply replaced some or all of the non-native species with native ones. These gardens are often geared to human sensibilities and historical tastes. The fact they attract more insect life than gardens comprised solely of exotic species is more a lucky side effect than a planned outcome.


And then there is the whole gamut of garden design options between the two extremes.
Semi Formal


The Importance of Native Plants
I would be willing to bet that most of us grow native plants, at least in part, for the benefit they provide to our wildlife. To that end, ANY incorporation of native species is likely to be better than none at all. However, Doug Tallamy’s research in the US has shown that the successful fledging of a nest of Carolina chickadees requires at least 70% native species within their foraging range. And anything below 30% will likely result in the complete loss of the nest of babies. This is because non-native plants do not host the diversity and numbers of insects necessary to feed a nestful of baby birds. Although Tallamy’s research looked at just the one bird species, it is probably safe to assume that it is similar for other bird species, since most birds – even the seed eaters – raise their young on a diet of caterpillars, spiders and other soft-bodied insects. (If you haven’t read them yet, I highly recommend Tallamy’s books Bringing Nature Home and Nature’s Best Hope.)


If you’re reading this article, then you are most likely already aware of the importance of native plants. But how many others are? You would hope that anyone who gardens would have an appreciation for nature. And even though native plant gardening is the fastest growing (pun intended) sector of horticulture in North America, a lot of gardeners are still unaware of its virtues.
Take for example a recent trip I made to a scenic small town in southern Ontario, noted for its active horticulture society and its beautiful gardens. In a 10 block walk, I saw one yard containing a native species in its flower beds. Note the singular. And technically, the town was a bit far north to actually claim Rudbeckia fulgida (orange coneflower) as a native species. (To be fair, in another part of town I did find a couple of gardens that were primarily natives, but that was it.) We have a long way to go to educate other gardeners on the benefits (and beauty) that adding native plants can provide.
Where Do I Start?
But if we want to grow natives, which way is best? Well, that depends. My own gardens fall somewhere closer to the ‘formal flower beds’ end of the spectrum, designed to be showcases of what we can do with native species. Though with the passage of time they are slowly moving away from that as I let plants spread and self-seed, often where they want.
I came at my gardens from the perspective of an educator wanting to show folks that native plants can be just as beautiful, and usually a lot more beneficial, than non-native species. My aim has been to bring those who knew only the Edwardian style of manicured gardens full of exotic plants into the world of native plant gardening.
In the municipality of Chatham-Kent (in southwestern Ontario) we recently held our second annual native plants garden tour. (Thanks and a shout out to Mike Smith with ReLeaf Chatham-Kent for spearheading this). This year, gardens once again ranged from restored acreages to small butterfly gardens, from gardens planted in a cul-de-sac island by a committee to a half acre of formal flower beds of only native species set in a private garden. Some have natives mixed with non-natives while other “purists” try to plant only what was found locally (or nearby) before Europeans arrived. Some have been growing natives for a decade or more; for others this is their first venture into growing indigenous species.
If you’re reading this, then at least you are interested in growing native plants. And if you haven’t started yet, don’t worry – it’s easy. But it will take some thought and some homework. First you need to decide WHY you want to grow native plants. That will help you choose the style that will work best for you.
Do you have already established garden beds? Perhaps you just bought your first house and have inherited a lot of non-native and possibly some invasive species. Do you like the layout of the gardens, or do you have a vision of your own? Start by identifying the non-natives that are invasive or otherwise problematic and digging those out. There are lots of on-line resources to help with this. Just Google “invasive plants” and your state or province. Or look up a document called “Plant me Instead”. Visit some native plant nurseries (this web site has a map of all the native plant sources in North America that I’ve been able to find), attend a webinar by your local naturalist organization, join a native plant gardening Facebook group (if you haven’t already). These are all great ways to learn about what is or isn’t native and to help you decide what to plant where.


Do you have a large, blank slate? This can sometimes be very intimidating. And unless you’ve got very deep pockets, you probably won’t want to convert the whole yard at once. But don’t just jump in with both feet. Even if you’ve been growing natives for a while, if this is a new location then watch the sun – where is it sunny the longest? Where is the shade? What is your soil type? (If you don’t know, get it tested. Your local department of Agriculture will be able to tell you where, and how much it will cost. Or you can buy a soil test kit from a number of sources, and though these won’t be quite as accurate as an official laboratory test, they may be good enough to get you started.) Is the soil dry? Are there low areas that might stay wet for part of the year or after a heavy rain? If all else fails, there are lots of knowledgeable folks living probably not far from you, and some of these will be happy to come and advise you (for a fee).
Water is Important,Too!
If your intention is to attract birds, dragonflies and other creatures, try to add moving water – either a small waterfalls or simply a fountain. The sound of running water will attract birds from far and wide, and you’ll see a huge increase in insects like dragonflies and damselflies, all of which will come to bathe and to drink.


There is no prescription for native plant gardening. We all grow what we grow for our own reasons. One thing everybody growing native plants seems to agree on, though – we wonder why everyone isn’t on board yet.
Happy native plant gardening.
Coreopsis tripteris

August in my garden consists of a lot of yellow, and a lot of tall plants. Coreopsis tripteris (tall tickseed) is one of the newer additions to my yard and is no exception to this. It doesn’t reach the lofty heights of Agastache nepetoides (yellow giant hyssop) or Silphium perfoliatum (cup plant), but it easily tops 6’ in only its second year (and this was a very dry year here). Its leaves, too, are much more delicate than some of the other garden giants and thus it provides a very airy elegance in the flower bed. It can be a bit aggressive given adequate moisture, but if you have the room, it is a lovely plant as a backdrop. (Plant Description and In the Garden sections, below, courtesy of Shaun Booth from In Our Nature.)
Common Name: Tall Tickseed
Scientific Name: Coreopsis tripteris
Family: Asteraceae (Aster Family)
Alternate Common Names: Tall Coreopsis
Plant description: Tall Tickseed features slender, smooth, cylindrical stems that are unbranched except for along the upper half of the plant. Opposite leaves are found along the full length of the stems. These leaves are odd-pinnate with 3-5 leaflets, each measuring up to 12.7 cm long and 2 cm wide. Leaflets have smooth margins, a linear-elliptic shape, a pointed tip and a wedge-shaped base. Lateral leaflets have no leaf stalk while the end leaflets do have a leaf stalk. Leaflets are further characterized by smooth upper leaf surfaces and finely hairy undersides. The uppermost stems are topped with solitary flowers that collectively form open, loosely flat-topped flower clusters. Each flower is borne on a flower stalk that is up to 25cm long. These flower stalks may have a couple leafy bracts along them. Individual flowers measure up to 5cm across and feature 8 widely spreading ray florets (petals) surrounding a dense cluster of brown disk florets. Flowers give way to small (4-5mm), oblong, brown seeds with winged sides.


In the Garden: Tall tickseed is a stately plant with radiant yellow flowers that reach for the sky. It is valued as a dependable structural plant with noteworthy winter interest.
Skill level: beginner
Lifespan: perennial
Exposure: part shade to full sun
Soil Type: well drained
Moisture: moist to mesic (to dry) – will tolerate some drought
Height: 60-240 cm
Spread: 60-240 cm
Bloom Period: Jul, Aug, Sep, Oct
Colour: yellow
Fragrant (Y/N): N
Showy Fruit (Y/N): N
Cut Flower (Y/N): Y
Pests: no significant pests
Natural Habitat: dry to wet prairies and meadows, marshes, oak forests (especially borders and clearings), fields, roadsides and railroad rights of way
Wildlife value: flowers are visited by frequented by butterflies, skippers and native bees, and birds are known to feed on the seeds
Butterfly Larva Host Plant For: Southern Dogface butterfly (Zerene cesonia) – though this species rarely visits Ontario


USDA Hardiness Zone: 3-9
Propagation: [C(60), L; D] Easily propagated by surface sown seeds (requires light for germination) in late fall. The seeds will germinate in a week or two and overwinter as a small cluster of leaves. If planting in the spring, the germination will benefit from 60 days of cold moist stratification before direct sowing. This coreopsis is also readily propagated by dividing the root clump in early spring or after it has finished flowering in the fall.
Additional Info: If grown in light shade, tall coreopsis tends to be open and leggy with a tendency to lean toward the sun. Grown in full sun, plants tend to be sturdier and have many more blooms. As with other coreopsis, deadheading will extend the bloom period and prevent unwanted seedlings, especially in smaller gardens where this plant can be aggressive especially if there is adequate moisture.
Native range:
